这里主要采用文字叙述,来试图阐释这个过程,用来梳理知识点和查缺补漏。如果其中的叙述不准确,还请谅解。
Q: 浏览器输入地址敲回车开始,到收到响应为止的过程,阐述其中的细节。
A:
前提
复杂的程序都需要分层。
概览
按照OSI七层协议来讲这个过程,重点是OSI的二层–数据链路层(以下简称MAC层)、三层–网络层(以下简称IP层)、四层–传输层以及应用层中的表现。到达应用层后,讲一下CDN的原理与常用架构。再简单讲一下数据中心的架构。
OSI 七层 vs TCP/IP 四层
OSI 的七层模型是一个开放式系统互联的参考模型,而 TCP/IP 协议簇是一组用于实现网络互联的通信协议。
OSI 的七层分别为: 物理层、数据链路层、网络层、传输层、会话层、表示层、应用层。
记忆口诀: All People Seem To Need Data Processing
TCP/IP 的四层分别为:接口层、网际层、传输层、应用层。
其中TCP/IP模型中的接口层对应着物理层和数据链路层,而应用层对应着会话层、表示层、应用层。
数据链路层
每个联网的设备都有一个唯一的硬件地址,即我们常说的 Mac 地址,Mac 地址用于在广播域中寻找对应的设备。Mac 地址虽然有唯一性,但是没有可定位性,所以出了广播域后则使用 IP 协议来进行通讯。
二层设备可以进行Mac地址与端口对应设备关系的缓存,可以缓存同一广播域内的设备。
其中Mac地址与IP地址的对应关系可以缓存在本地路由设备中,称之为路由表。而在已知IP未知Mac地址时,可以发起ARP请求来查询Mac地址。
网际层/网络层
浏览器中输入的一般是域名,域名通过 DNS 解析为IP。
首先判断对应IP是否在同一网段内,即通过CIDR来判断,若对应IP不在同一网段,则请求通过网关利用路由协议去寻找对应的网络和设备。当经过中间的路由设备(三层)时,先比对Mac地址是否一致,再比对IP地址是否一致,看是否为发给自己的包还是需要转发出去。
路由协议
路由分为动态路由和静态路由。这里的路由协议即动态路由协议。
距离向量路由协议
基于Bellman-Ford算法, 路由器将部分或全部的路由表传递给与其相邻的路由器
RIP:
1. 使用跳数作为度量值
2. 最大跳数为 15
3. RIP v1 中会定期同步整个路由表
BGP: BGP可以看作一个高级距离向量路由协议。在BGP系统中,可以将网络分为多个自治系统。自治系统内部使用iBGP来同步路由信息,而自治系统之间使用eBGP广播路由。
自治系统:一个(或多个)实体管辖下的所有IP网络和路由器的全体。自治系统由IANA分配一个ASN(自治系统编号),从而在互联网的ISP之间运行BGP协议。
ASN: 一个16位的编号,现在已经有32位的写法:<高十六位的十进制数字>.<低十六位的十进制数字>
自治系统分类:
1. Multihomed As(多出口自治系统):多与一个连接的自治系统。这类系统不允许其他自治系统穿过它去访问另一个自治系统。
2. Sub As(末端自治系统):仅与一个其他自治系统相连的自治系统。
3. Transit As(中转自治系统):一个自治系统通过自己提供将几个隔开的网络连通的服务。这就是 ISP 的实质。
BGP 的使用条件:
1. 需要支持存储大型路由表的路由器
2. 需要多个连接
3. 有足够的带宽传送所需数据(包括路由表)
最短路径优先算法
基于 Dijkstra 算法, 路由器将链路状态信息传递给在同一区域内的所有路由器
OSPF:
1. 使用组播发送链路状态更新,在链路状态变化时使用触发更新,提高了带宽的利用率
2. 无最大跳数限制,且以延迟和开销的作为度量值
IGP 与 IBGP 的区别与联系
IGP 包括了 OSPF/RIP 等协议,是在自治系统内部使用的路由协议,其主要作用是发现与计算路由。
而 IBGP 也是在路由系统内部使用的路由协议。两者的区别是:
1. IBGP 会将路由发现的工作全交给 IGP,而其本身着重于路由的控制。
2. IGP 对于大型路由表的处理能力很差,而IBGP则可以将其分层处理。
3. 若直接将 BGP 的路由信息交给 IGP 处理,会丢失其中的路由属性,从而有路由环路的隐患。而IBGP可以处理这些路由属性(第一条)
网关
第一种,在出网关之后目标Mac地址变为下一跳设备的Mac地址,而来源IP和目的IP始终不变,直到到达指定设备。该方法适用于无冲突IP地址的场景,而在IP地址重叠时就需要另一种NAT网关了。
第二种,即NAT网关,在请求出了网关之后,来源IP和Mac都变为网关的,而目的IP不变,到达下一跳。当响应到达时,再将目的IP和Mac映射回去。
DNS
DNS 是一个用来做域名与IP地址转换的分布式数据查询系统。在客户端发起DNS查询之后,会先查询本地DNS服务器,即运营商或路由器上配置的DNS server,如果没有记录则会查询根域名服务器,根服务器会将顶级域名的服务器地址返回,顶级域名服务器将权威域名服务器地址返回。其中客户端向本地服务器发起的是递归查询,而本地dns服务器向上查询则是迭代查询。
传输层
在 IP 包头中标识着传输层的协议类型,常见的有 UDP 和 TCP。
UDP
UDP 是不面向连接的协议。其继承了 IP 协议的大部分特点:如按包发送、无状态、无序、无拥塞控制。简单来说,就是一个不维护状态的传输协议。在 UDP 的包头中,只有源端口号和目的端口号来标识连接。在简单的环境、内网及允许丢包的场景中可以使用。也可以在应用层实现状态的维护,从而变成一个可靠的连接。
TCP
TCP 是面向连接的协议。所谓连接即一系列状态的更替。维护了一个复杂的状态机之后,使连接变得有序、可靠、控制拥塞等功能。但 TCP 的底层 IP 协议是无连接和无序的,所以 TCP 实现这些特性大量使用了重传算法和拥塞控制算法。
三次握手:请求端发起SYN包想建立连接(SYN_SENT),接收端收到SYN包之后返回 ACK + SYN 包(SYN_RCVD),请求端收到 ACK 包之后(ESTABLISHED),再响应对端的 SYN 请求一个 ACK,对端收到 ACK 包,则状态变更为 ESTABLISHED。此时,两端均完成了一次收发包,状态为 ESTABLISHED,连接建立成功。
四次挥手:请求端发起 FIN 包想要终止连接(FIN_WAIT_1),接收端在收到 FIN 包后返回 ACK(CLOSE_WAIT),发起端接收到 ACK(seq=k+1) 则进入 (FIN_WAIT_2),当接收端处理完毕上层逻辑后,返回 FIN + ACK 包(seq=k+1),发起终止连接(LAST_ACK),发送端在收到这两个包之后,响应 ACK 包,并进入 TIME_WAIT 状态,等待两个 MSL 后关闭连接。而接收端在收到 ACK 后也关闭连接。TIME_WAIT 状态是为了防止接收端没收到最后一个 ACK 包,从而发起 FIN + ACK 重试。
应用层
http
看网页一般使用的是 http 协议来传输数据。http 是基于 tcp 应用的协议,在http中请求与响应的报文均为明文。请求报文分为:请求行、请求头、请求体,其中请求行可以细分为请求方法和请求地址。响应报文分为:响应状态、响应头和响应体。其中响应状态分为响应码和原因。
常用的请求方法有: GET/POST/PUT/DELETE/OPTION
常见的响应码有: 200 OK/201 Created/301/302/403 Forbidden/404 Not Found/405 Not Allowed/500 Internal Error/502 Bad GateWay/503 Service Unavaliable/504 Gateway Timeout
keepalive
其中 TCP 协议中有 keepalive 概念,在 http 中也有 keepalive 概念且在 http/1.1 后会默认开启。其中 http 的 keep-alive 是允许客户端通过同一个 tcp 连接发送多条请求,而 tcp 的 keep-alive 则是通过心跳来让 tcp 连接保活的一种机制。两者没有直接的联系。
https
由于 http 的请求和响应报文均为明文,在对安全要求高的场景就不适用了。这时就引入了 https。
https 是使用非对称加密交换密钥,交换密钥后使用对称加密的基于 http 的协议。双方进行握手的流程是这样的:
- 由客户端发起 client hello,主要是用来商议加密协议版本、压缩算法、一个随机数c1以及SNI等信息
- 服务端响应 server hello,告知客户端采用的加密协议版本、压缩算法、以及在服务端生成的随机数s1,这时会将客户端生成的 c1 存起来备用
- 服务端还会响应 server certificate 即服务端的证书信息供客户端查验。
- 最后响应 server hello done 包告诉客户端 hello 信息结束
- 客户端在校验证书合法后(将证书的信息做一个散列计算和CA上的签名用CA提供的公钥解密后对比),生成 pre-master-key 即对称加密的密钥。
- 将随机的 pre-master-key 传输给服务端,即 client key exchange
- 客户端发起 change cipher spec,即更改加密协议,由不对称加密改为对称加密
- 客户端发起 encrypted handshake message,即使用 c1 + s1 + pre-master-key 加密过的信息传输给服务端
- 服务端也发起 change cipher spec
- 服务端同样发起 encrypted handshake message
这样双方的 ssl 握手就完毕了。开始传输加密数据了
]]>

 示例图
示例图 float
float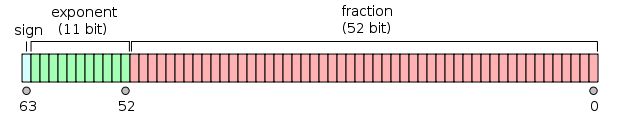 double